Showing posts with label How-To. Show all posts

Sunday, 27 October 2013

How to Make your To-Do list work for you:


With so many things to be done, listing things down has been a productivity hack for ages but only few have mastered the skill of making their to do lists work for them. If you are merely adding items to the list without ever getting them struck off the list as “Done”, you are doing it wrong. Here are few tips that you’ll find helpful in making this amazing time management tool as your beloved friend.
1.    ADD TASKS NOT PROJECTS
You might have an essay to write, an assignment to submit, a presentation to prepare or a major deadline to meet. DON’T write them on your to-do list. A complete project that takes more than a day to complete should never be written on the to-do list EVER. The sheer enormity of the work that lies ahead of us in the form of that project cripples our productivity, leaves us fearful and encourages us to procrastinate.  
Stuffing to-do list with projects seldom get things done as we only keep looking at something monstrous and hardly ever find courage to start working on it. For example, let’s say, I have a presentation to make in five days that can have a huge impact on my career. Every time I’ll look at my list, my heart will pound and I’ll try to escape the pressure by avoiding it completely. Don’t do it.
Break your projects into smaller tasks. Write, only those tasks on your to-do list that you intend to get done on a particular day. Continuing with the earlier quoted example, let’s say for that particular presentation, I need to gather information, do meaningful analysis, make graphs, and be prepared for possible questions. I’ll include merely gathering information as a part of Day 1’s to-do list. Ah! Already feel less stressed.
2.    PRIORITIZE:
We can achieve 80% of the results by focusing on merely 20% of important tasks that really matter. So, once you write down all the TASKS that you plan to get done, start prioritizing them. Sorting them into four categories, important & Urgent, Important but not Urgent, Not important but Urgent and Not important and Not Urgent, really helps.
Be honest. Meeting your friends might be important to the social bug inside you, but is it really going to help you achieve your goals? Prioritization should take place in the light of the goals that you have set for yourself. In this way, you’ll manage your time to get closer to achieving those goals EVERY SINGLE DAY.
3.    ESTIMATE TIME REQUIRED FOR EACH TASK:
You should always have an estimation of the time required by each task. For example, a significant task might require 2 hours and replying an important email may take only 10 minutes. This estimation will leave you in a good position to plan your day. Let’s say I have an appointment to make, I’ll try to plan it while I commute to my office or during my lunch break. Getting smaller tasks done while you commute or wait can leave handsome amount of time for important more challenging tasks.
4.    60 MINUTES UNDISTRACTED SLOTS:
Our attention span is very small. We can’t stay focused for more than 60 minutes; unless, deadline is too close to ignore. Working in 60 Minutes undistracted slots is the best way to get maximum done. If you start your day at 9:00 am and work till 5:00 pm, you’ll have approximately 4 to 5 “60 Minutes slots” in which your productivity will be at its peak. Set yourself a timer (I like to use time timer), keep your cell phone aside, swear to not check any social media website and just focus on the task at hand. After 60 minutes, take a break, socialize with colleagues for 5-10 minutes and get ready for another session.
5.    2 MINUTES RULE:
I couldn’t find anything powerful than 2 minute rule when it comes to time management. Any task that requires 2 or less minute should get done immediately. I have modified this rule a bit though. I set aside 15 minutes in between 60 minutes slots as my time to get things done that require 2 minutes. It’s my way of utilizing my break hours. So, when my timer says 60 minutes session is over, I rewind the timer but this time for 15 minutes and get 2 minutes task done like responding to email, making calls, cleaning up my desk, filing important papers etc.
6.    LINK IT TO REWARDS
At the end of every day, I like to score my performance. Let’s say I have
TYPE 1 (Total 2 Tasks to be completed): Important and urgent task completed: 4 Points
TYPE 2 (Total 3 Tasks to be completed): Important and Non-urgent task completed: 3 Points
TYPE 3 (Total 3 Tasks to be completed): Non-Important and Urgent task completed: 2 Points
TYPE 4 (Total 2 Tasks to be completed): Non-Important and Non-Urgent task completed: 1 Point
My maximum score on this particular day will be 25 (8+9+6+2). If I score more than 75% I reward myself on good performance.
Writing things down in to-do list increases the chances that you’ll have them completed. I have found it very productive to plan my day the night before. These are my tips that I use every day to stay on top of my schedule and make most of the day. I would love to hear from you, what you do and how you squeeze out the maximum out of 24 hours.
                                         

Image Credit: 1

Thursday, 24 October 2013

How to Organize Linen Closet:


The thing I love more than a nicely made bed is an organized linen closet that contains neatly folded sheets. Why I love it more than the made bed? Because an organized closet makes it much easier to find everything speedily that is required to make bed. Finding one pillow case missing is so frustrating.
Normally, at many homes, I have noticed, linen closet is a place to dump everything that doesn’t find any other home. So, today, I’m going to share some inspiring ideas to organize an overflowing linen closet.
 
WHAT YOU WANT TO SEE IN IT?

Unless you are crystal clear what functions you want your linen closet to serve, it will be a mess. You know why? Because, whenever you’ll want to hide clutter, you’ll always look to this poor closet. Be honest with yourself. Take your time and list down what you want to store in this cupboard. You might want to consider storing beddings, folded sheets, towels, extra tissue roles, medicines, first aid kit, and/or blankets etc. these are merely suggestions as only you can decide how big or small your closet is. If you have space, you can also store extra beauty and hygiene supplies as well.
COMPARTMENTALIZE:


Once you agree on the items that you want to store, think of the ways to compartmentalize them. Not always we have a linen closet with built in dividers; nonetheless, we can use shelve dividers and baskets to segregate everything. Compartmentalizing and creating distinctive zones is important to force yourself to put things back to their designated places. And I feel, once a thing has an “official home” it is more likely to stay organized.
CONSIDER FREE STANDING LINEN CLOSET:
I know how bad it feels to not have enough built in closets to make one dedicated to linens and beddings. But, so what! I don’t have one either. And, I find free standing linen closets nearly as perfect as a built-in one. Rather, they facilitate more compartmentalization, offer more drawers and are easier to move around.
LABEL BASKETS:
Having labeled baskets is such an amazing way to keep everything out of sight and not out of mind. On reading a label, you can easily discern what to expect in that individual basket without even pulling it out. And labeling is so much fun. Literally, you can have your personality and creativity illustrated through customized labels. I looooove making customized labels. In DIY week, I have one post dedicated to label making. Hope, you’ll enjoy it as much as I enjoyed writing it. Fingers Crossed!
You can optimize the utilization of closet space by adding made-up shelves.
FOLD IT TO HOLD IT:


I swear I can spare as long as it takes to fold sheets nicely than to throw them In closet jumbled up. Not because I love folding (I know nobody does); but, I know folded sheets stay put and are stress free to work with. Little time spent to fold sheets pays off big time. And personally, I like to stack folded sheets vertically in a basket. That supports me to look at every option available without ruining the entire arrangement.
I hope you find these ideas helpful. And,
                                      
Picture Credits: 1, 2, 3, 4, 5, 6

Saturday, 19 October 2013

Room By Room Organizing With Pegboards:


It wasn’t a long ago when I absolutely fell in love with nicely painted pegboards to organize just about everything. Now, garage is not the only place where you’ll find this amazing organizing tool doing wonders. Reason why I fell in love with pegboards was their ability to make organizing easy and visually pleasing. Just imagine, before pegboards, our garage used to look a sheer mess. This post is a celebration of pegboards’ existence and a way to organize every room using them.
KITCHEN:
Cooking gears are hard to handle. When I’m cooking, I like to find everything quickly. Pegboards are like hangers for me. Just as I can see my hanged clothes better; hanged kitchen tools are easier to find. And, looking at them is no less than a cookie treat for me.
 
CRAFT ROOM:
Okay, now if you are crafty, you know how quickly those laces and ribbons get tangled. And those beads start rolling under the furniture secretly. Using pegboards in craft room is a guaranteed way to give yourself a huge favor.
KIDS ROOM:
I’m still single; but, when I was a kid I knew an organized station used to make me so productive. Pegboard is ideal not just for holding stationery cans but also the art work. With little efforts, it can be turned into a display board, stationery organizer, calendar, and a bulletin board.
BEDROOM:
Sometimes, when bedroom is small, finding storage space around the bed is little difficult. Why not use behind the bed space to store small items. It’s like a headboard with loads of storage space and everything will stay within reach.
JEWELRY:
I have always found it hard to organize necklaces in a scrambled free manner. Little hooks attached to pegboards let you organize necklaces, smaller tops, sun glasses and other accessory items with style. Other earrings organizing ideas can be found here.
HOME OFFICE:
Good three four years back, I watched Alejandra’s home office video and it was absolutely stunning. The way she used the combination of kebab sticks, hooks and a colored pegboard was simply amazing. Since then, I have adored using pegboard to keep my little home office desk organized. There’s so much you can do with it.
GARAGE:
Can you think of organizing garage without pegboard? At least I can’t. With so many tools, heavy gears, and small screws garage becomes a challenging place to keep organized.
LAUNDRY ROOM:
Since last month, Me and my younger sister are doing laundry. I didn’t find washing difficult more than keeping cleaning bottles, iron stand, and other things in control. Finding right bottle of surf, soaps and starch in itself was a challenge. This idea of organizing laundry room with pegboard has definitely made me interested in giving it a go.
YOUR SAY!
Did you find these ideas helpful? Have you used this wonderful tool anywhere in your house for organizing purposes? Share your ideas with us.
Photos Credit:1, 2, 3, 4, 5, 6, 7, 8, 9, 10, 11, 12

Friday, 18 October 2013

Let's Organize Living Room:


Living room is the happiest place in any home where individual members start sounding more like family. At my place, living room serves many functions – it’s an entertainment area, dining hall, reading corner, games’ zone, and a family space. With so much traffic, and of course, so many functions to serve, I knew my living room needed more than daily cleaning to stay organized. Here are some tips that help me big time in keeping it neat, orderly and fun. It’s our home’s happy space; and, I wanted its every corner to be cozy enough to make the family time relaxing, joyous and treasured. 
 
FUNCTIONAL ZONES:
Okay, in order to make your living room practical and clutter free, you first need to understand the purposes this room gets used for. This helped me equipping it with right furniture and dividing it in distinctive zones. Clear demarcation of distinctive zones doesn’t require erecting up a cemented wall; rather, sometimes free standing storage shelves do the double duty. They nicely add to the room storage and, without looking visually odd, smoothly separate one zone from the other.
Why it’s important? It keeps all the items belonging to one type of function at one place. For example, you might be using your living room as your home office. You would definitely not like to search for necessary business receipts under the sofa, on the side table, and/ or worse mixed with magazines.


Functional zones provide peace of mind and in a smaller area give the feeling of larger spaces. You force yourself to leave one particular type of work at one place to start doing another type of work. At least it compels me to be disciplined to leave my laptop at office desk and have food on the dining table.
ENTERTAINMENT CENTER:
Entertainment center can either be the root cause of the mess or a focal point of the room. Try to buy such furniture that lets you keep wires out of sight. If you are able to make this heart of the room clean, the entire room will look sparkling.


TURN WALLS INTO STORAGE:
In smaller homes, storage is always an issue; and, I always recommend using walls optimally to increase storage. Well, living room’s walls are the best to hold all my books and living room related particulars. Stuffing entertainment room with furniture just to increase few notches of storage, certainly, is not the real solution.
MINI BASKET FOR REMOTE CONTROLS:
AHHH! Lost remote control frustrates me so much. Putting every remote control in a small basket is a big life saver for me. I am now developing a habit of putting remotes back in baskets when I am done watching TV. So, yeah I’m now 100% sure where to find this magical wand again.
NEW RULES TO FOLLOW:
ü  If your living room isn’t spacious enough for full size furniture, skip the conventions. Half sized furniture does just fine.

ü  For magazines, stick to the rule of throwing one magazine out before bringing new one in.

ü  After every gathering, spare five minutes to reset the living room.
FLOOR IS YOURS:
How to do you keep your living room clutter free and yet relaxing and fun. I would love to hear your tips.
Pictures Credit: 1, 2, 3, 4, 5, 6

Wednesday, 16 October 2013

Be Organized, Be Elegant:

Elegance is when the inside is as beautiful as the outside.
– Coco Chanel
For over a year now, I have been very curious as to how to acquaint every aspect of my life with elegance. Like millions of people, I was not given training to behave elegantly as a lady; and, it was only out of my personal inclination that I researched this topic a lot. I read many blogs, articles and books on tips to be more graceful.
Some articles merely suggested looking up to role models - hoping that their way of being stylish would be good enough to boast anyone’s individual personality. While, some other articles tried to sum up the whole evolution of taking decision, action, and sticking to the challenging undertaking of spending life with a class in certain number of steps.
By no mean, I am claiming this one year research has empowered me to conclude the vast topic of elegance. However, it has enabled me to develop a clear sense of direction. In my humble opinion, IF YOU WANT TO BE ELEGANT, BE ORGANIZED.
UNORGANZIED LIFE, INELEGANT LIFE:
When was the last time you were able to enjoy the moment instead of rushing, yelling, and trying to catch things up? Let’s imagine our morning routine (given we couldn’t care less about getting organized). My office starts at 9:00 am. Having stayed up late at night, I didn’t bother getting up before 8:20 am. Because my closet was a mess, I didn’t have clothes hanged as outfits. Instead of thinking how could i look classy, I used to do with the very first outfit that I was able to find. Shower? Oh no time for that. I used to just wash my face, rush to vanity for makeup ritual, didn’t even think of accessories, let my hair looked messy and merely swallowed one slice as breakfast. Most of the time, I was late.
MONEY ISN’T AN EXCUSE:
Did I enjoy that routine? No, not at all! Every morning was frustration and led to a very unproductive start. I must admit that not for a single day I looked classy. I was mistaken as I thought perhaps I need MORE makeup, MORE clothes, MORE shoes, and MORE accessories. So, I heavily spent on such items and the result was – of course a failure.
The truth is, I wasn’t organized to utilize the resources that I had and never stretch MYSELF to the highest standards. Elegance, oppose to widely held belief, is not dependent on money. It’s an attitude which when developed does the talking on your behalf.
SO, WHY I SAID BE ORGANIZED, BE ELEGANT?
We often question ourselves as to why elegance is so rare nowadays. Perhaps, the scuffle of doing 5 times more than our ancestors in the same number of hours has put our lives on fast forward. Elegance resides in getting slowed down. Did you ever meet an elegant lady that talks fast or eats fast, or walks fast? No, because every action performed with deliberate steps unhurriedly gives us ample time to dominate our styles over the humdrum of life. No matter how expensive clothes you wear you’ll have hard time experiencing gracefulness if you don’t know when to stop and just live the moment. And getting organized let us do just that. It permits us to slow down as life feels in control.
ORGANIZED LIFE, ELEGANT LIFE:
Let’s rewind the morning scene and this time in a more organized manner. Now, my office still starts at 9: 00 am; but, I get up around 7:00 am. I do exercise for 15 minutes followed by 15 minutes of yoga. This energizes my body, let me feel the nature and be grateful for yet another beautiful day. Then I take a relaxing shower that washes away every possibility of laziness. Finally having developed the habit of ironing and hanging my clothes as complete outfits for the whole week on weekend in advance, I feel freedom in the morning. Love, love, love extra time to select outfit and mix & match accessories (one bracelet, watch, one ring). I am really happy that now before the day starts I am able to fill out my to-do list. Trust me, it keeps me productive and I don’t find myself working on unimportant tasks.
Family life and relationships? Couldn’t have been better. Instead of my mother screaming at me that I am late for yet another day, our breakfast time is now more cherished and celebrated gathering.

Sunday, 13 October 2013

7 Easy to Tips to Organize your bathroom on budget:


A bathroom is the most used space and yet terribly ignored part of the house. Many a times, it’s not given much attention as spending money on a bathroom is the least priority of many. Well, the good news is you don’t need to spend extravagantly to make your bathroom look organized, neat and up graded. With tweaking, creative use of unused items, and little effort you can transform your bathroom in a relaxing area. 


TIP 1: DECLUTTER
You can’t get an organized bathroom if you are not ready to let go of the clutter that has been sitting in the drawers since God knows when. With the mentality that we might need it someday, we keep on hoarding and that makes it difficult to put in place a system to keep things organized. It’s the time to say good bye to expired beauty products, opened bandages and broken tools. Go through each drawer and for every product decide if it’s to be kept and if it really belongs to the bathroom.
TIP 2: CONTAIN IT
Glass containers are a great way to organize small bathroom items. Every household has a nice collection of empty glass jars that can be sterilized to designate places for items like cotton balls, bandages, brushes, rubber bands, bandages, and other smaller products. Mason Jars can be hanged to the wall to keep the counter space free.
TIP 3: USE BASKETS
Organizing beauty products according to needs in baskets is one of my favorite organizing hacks. It gives freedom to return to only those products which I need to get ready in the morning or when it’s time to call it a night. In the morning, when I have more of makeup steps to follow, my makeup basket keeps everything in reach. And, at night, when it’s time to pamper my skin, I keep night baskets handy that holds all the skin care products. Trust me, it saves time, energy and keeps me from going through all the products just to find the desired moisturizer. You can also have mini baskets for manicure, pedicure and other relaxation purposes.
TIP 4: NEW USE OF OLD ITEMS
This is by far the most satisfying trick to organize just about anything. Anyone can go to market to buy organizing products but only few can think of new uses for old items lying around the house. For example, if you have a magazine rack that is lying idle in your garage, put it in use to keep your towels organized. And what could be cuter than bringing little painted flower pots to the bathroom counter to organize cotton balls and other smaller items. And, if feeling excited, turn your towel into a pockets organizer.
TIP 5: MAKE EVERY INCH COUNT
In small bathrooms, space is precious. Instead of whining about lack of space, think of creatively using every possible inch to store bathroom items. I have seen washrooms that may be smaller in space but looked extremely lavish just because of inventive way of looking at the whole picture. Have a corner where free standing toiletry stand doesn’t fit? Let’s use baskets there. Need to place your jars nice and intact? Turn to counters’ doors. Don’t know where to put your favorite decorative item? Use flush tank. Bathroom’s countertop is too small for all the items? Come up with tiered storage.
TIP 6: ORGANIZE UNDER THE SINK AREA
You can double the space by effectively utilizing under the sink area. Instead of making it a place to dump your odds and ends, turn it into a place where everything finds a blissful home. Properly labeled baskets/containers will upgrade your bathroom and will bring a smile to your face.
TIP 7: SHOW IT SOME LOVE EVERY NIGHT
Every night, give your 5-7 minutes to wipe the countertops, pick up thrown items on floor and put back everything that’s out of place. Reward? Next morning, you’ll be saying hello to a clean bathroom and getting ready will much easier.
FLOOR IS YOURS!
What’s your favorite tip to keep bathroom organized? Do you give it the attention it deserves or does it look untidy? Any creative tip that you used to add style to this area of house?
Pictures Credits: 1 /2 / 3 / 4 /5 (a) / 5(b) / 5(c) / 6(a) / 6(b) / 7 / 8 / 9(a) /9(b) / 10 / 11 / 12
 

Thursday, 10 October 2013

How to Organize Photos


I Love taking pictures and looking at them afterwards to relive the happy moments spent with family, friends and loved ones. With numerous camera clicks, challenge of keeping pictures organized increases. And, unless we have a solid system in place, it’s really hard to keep the clutter at bay. So, in case of a family reunion, we often find ourselves running to every corner of the house to find photo albums.
For ages, photos of our family were so called organized in small photo albums with capacity to hold only 50 -60 photos per album. A picture once out from one of the plastic covers kept on wandering for a new home.
This post is for every one looking for some practical tips and tricks to organize photos. Though, with digital cameras, challenge has somewhat altered its form; a sturdy system will help you keep your printed pictures and digital images both in order.
TIP 1: PURGE
You might say, “Oh! I don’t want to let go of any of my pictures.” But truth is you really need to go through your photo collection to toss or delete random and blurry camera shots, multiple takes of one scene and or any other picture that you think is not worthy enough to be saved for future. And of course, there’ll be several such pictures.
While deciding which particular photo to keep and which one to toss, ask yourself a simple question. Would I cherish seeing this picture again after five years? Your answer will serve as an antidote to your hoarding attitude. Pictures that capture people are one of the best pictures as it hold in them memories spanning over lives.
TIP 2: CONSOLIDATION BY YEAR
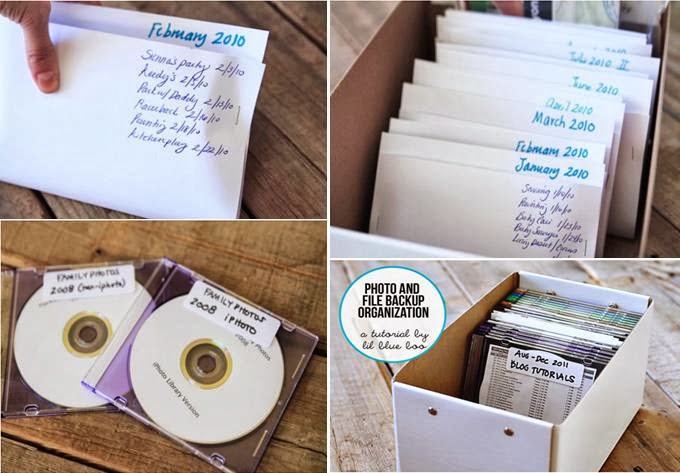
Once you have gone through the pictures and kept only the best ones, it’s time to arrange them in chronological order first by year and then by month. For example, let’s talk of 2013! I would keep all of the pictures taken in the month of August in one file/folder. Some people prefer organizing their photos by events. Printed photos would go in an envelope with the details of all the events happened in that particular month listed in detail on the face of envelope. For digital photos, make it a habit to take a backup every month by burning it on CD and label it properly.


Could it be any easier to organize photos than this solution of having CDs burned for photos related to a specific event with customized outer covers? Not only thousands of pictures rest safely in a CD that rests on a CD or book shelves but it also look pleasing and awe-inspiring.
TIP 4: FOR PRINTED PIX - CONSIDER PHOTO BOXES
TIP 5: FOR DIGI PIX - CONSIDER ONLINE PHOTO SITES
Taking a backup of digital photos on CDs surely helps saving the happy moments but sometimes CDs get corrupted. Of course, we can’t leave that to chance and it’s, therefore, recommended that you consider online photos sites that give you space to privately store or publicly share your photos. You can even use Drop Box for storing your albums and saving the storage space of your gadget for something else.
Pictures Credit: 1, 2, 3, 4, 5(a), 5(b), 6
Related Posts Plugin for WordPress, Blogger...